Welcome to Avalon! You are about to embark
on one of the most unique adventures in Second Life. This interactive quest is
filled with mystery, suspense, and danger lurking around every corner. Be
prepared to meet your fate many times over, but have no fear, you will be
resurrected to full health and able to resume where you left off.
You must use the Avalon HUD at all times
while doing the quest adventure. You may start by choosing the free Demo HUD
that is on the ground near the graveyard landing point, or you may click on the
Gold Dragon HUD Giver that is rotating above the podium and buy the full
version of the Order of Avalon HUD for $500 Lindens.
To purchase the HUD, just right click on the HUD giver and select “pay”. You will see the following message in local chat:
< Order of Avalon HUD >: Please pay the object 500 L$ to buy the HUD.
< Order of Avalon HUD >: Be sure you are able to receive items and do not decline it automatically. Disable 'Busy' mode, if enabled.
Accept the folder you are given and wear the HUD at all times while on your journey.
Read the notecard you have received in the folder with your Order of Avalon HUD and familiarize yourself with the various buttons and functions.
Your HUD purchase is a lifetime purchase, and you will be able to receive any future updates for FREE, simply by clicking on the HUD Giver again and getting a redelivery.
You must keep your HUD “charged” with
protection at all times. To do this, just stand near to the Gold Dragon Avalon
HUD giver. You will receive the following message and the Dragon (or Shield) on
your HUD will turn from silver to gold:
“Avalon HUD - Version 2.2: You feel
the magic floating through your body, creating a protective shield around you.”
You will die many times during your
adventure. When this happens, you will not be able to move until you choose a
“Resurrection Point”. Your screen will look like this:

Simply choose the portal that is closest to
your vicinity. In most cases, this will be the Skull Resurrection Point which
takes you back to the cemetery entrance. There you will have to be sure to
charge your HUD with protection, once again, before you proceed further.
_____________________________________________________________________________________
Click on the FEATHER above the book at
the cemetery entrance and receive a notecard titled "Adventurer's
Dungeon Guide"
Read this guide.
You will collect many objects during the
quest and it is suggested you make a folder to keep these safely organized.
IMPORTANT TIPS:
- Be sure to have your sound turned on for a complete immersive experience while on your journey. The various sounds and music clips that are generated during your travels will augment the atmospheric mood of the catacombs. There may also be times where the only indication that you have uncovered the next step is the distinct sound of a door unlocking.
- Do not run, teleport or try to sit on objects within the catacombs or you will be ejected due to the anti-cheat system in place.
- If you are working in pairs or groups, only one person may use a ladder at a time. Wait for each person to reach the bottom before another uses the same ladder or you will be ejected.
- If you need to click on a ladder or portal with a “sit” animation, be sure you are standing very close to the object or portal. If you try to sit on any objects from a distance it will cause you to be ejected, due to the anti-cheat system in place.
- Pay attention to local chat when you click on quest objects. NPC’s will “speak” to you, and many objects will provide hints.
- Dialogue from NPC’s and objects will be displayed as bold text throughout this guide. These dialogues can be read in the Second Life local chat as you proceed through the adventure.
- Dialogue that needs to be spoken into the local chat by the player will be displayed as red bold italics throughout this guide.
_____________________________________________________________________________________
Next, read the "Catacombs of
Avalon" book on the pedestal next to the HUD Giver.
In the FAQ section, the book tells you:
Q: Where do I start?
A: After you have read the
"Adventurer's Dungeon Guide", search for a pirate's grave. There you
will find your first hint.
Now you are ready to begin!
_____________________________________________________________________________________
ITEMS 1 -4: GET THE
LANTERN, WOODEN HANDLE, SHOVEL, MAP
First, enter the graveyard through the open gate and find the grave of a pirate in the cemetery. (It is on the right side towards the back.)
You find a LANTERN close by – click
on it and pick it up.
Second Life: Lantern gave you
'Lantern'
Next, click on the pirate grave:
Grave: If I want to dig, I'll need a shovel.
You see a shovel in the dirt next to the
pirate grave and click on it.
Shovel (broken): A broken shovel. This one won't do. You'd better try to find
another one.
You search through the cemetery and find
another shovel in a grave closer to the cemetery entrance.
Old
Shovel: Another shovel...
Old
Shovel: Oh, it broke! This won't be easy. Maybe you should look outside the
cemetery?
Second
Life: Old Shovel gave you 'Wooden Handle'
Accept the WOODEN HANDLE offered,
you will need it later!
Go outside cemetery gate and find the dirt
pile near the cemetery entrance. You see a shovel there and click on it.
Shovel: A
shovel! This one seems to be in good enough condition...
Second
Life: Shovel gave you 'Shovel'
Go back to the pirate grave, wear the SHOVEL and click on the grave.
Grave Dirt whispers: You start
to dig...
The dirt pile clears and exposes a coffin
beneath. Click the coffin and it will open.
Remains: There are rotten
remains of a human inside the coffin. The skeleton is holding an old map in his
hand.
Click on the skeleton inside the coffin and
take the OLD MAP:
Remains:
Carefully you free the map. It is very old... there's a mark on the map.
Second
Life: Remains gave you 'Old Map'
_____________________________________________________________________________________
ITEMS 5-8: GET THE
CROWBAR, RING OF AGES, FAIRY FOLLOWER, CROWN OF THE CRUSADER
Wear the OLD MAP and click on it:
Old Map:
This is a map of the forsaken graveyard.
Old Map:
There is a mark on a grave on the left side of the map.
Look for the for the red X on the map and
locate this grave within the cemetery.
You find the grave on the map and click on
it:
Stone
Plate: You try to move the stone plate, but it is too heavy.
Stone
Plate: Or maybe you are just too weak? Some kind of lever might help.
You search the cemetery and find a CROWBAR inside the Mortuary sitting on top of a wooden crate.
Crow Bar:
A crow bar, this might be useful.
Second
Life: Crow Bar gave you 'Crow Bar'
Go back to the grave and wear the CROWBAR,
then click on the Stone Plate.
Stone
Plate: Using the crowbar, you manage to remove the stone plate.
Proceed down the stairs into the hidden
chamber below the grave. You come to a room with a large skull on the wall and
9 Obscure Chalices sitting on a stone shelf.
Click on the skull on the wall:
Visage of
Death: The right chalice opens the door. Choose, and drink... and may your
choice be wise.
Now you must choose a chalice and click
on it. Only ONE will open the door, the rest are filled with poison and will
kill you.
If you click on the wrong chalice, you
will DIE:
Obscure
Chalice: You took the chalice. After hesitating for a short time, you drink
from it.
Visage of
Death: Your choice was...
Visage of
Death: W R O N G
Obscure
Chalice: The chalice contained a very strong poison. You suffer a sudden and
painful death.
Avalon HUD
- Version 2.2: You died. Click one of the teleport buttons in the HUD to
resurrect at the position of your choice and regain your ability to move.
If you have DIED, click the SKULL portal
to resurrect and return to the cemetery entrance. Go back to the Visage of
Death and try again.
Think of Snow White or "7"
dwarfs - click on the 7th chalice.
Very
Obscure Chalice: You took the chalice. After hesitating for a short time, you
drink from it.
(click the chalice again)
Statue of
Death: Your choice was...
Statue of
Death: W I S E
Listen carefully and you will hear the
door to your right unlock. Quickly click on the door to and open it. (If the
door still says it is locked, just click again a few times until it opens for
you.)
Enter the next chamber and find the sign
on the left wall that reads:
"Press
the symbols in the correct order, then pull the lever. Seek them near the keep
on Avalon, they will reveal the right order."
Next, click on the sign:
Inscription:
Five symbols are hidden on Avalon, inside and near the Avalon Stronghold.Inscription:
Find them and learn about their correct order. Examine the statue on the
Fountain of Justice inside Avalon Stronghold, to learn about their whereabouts.
Go to the main landing point now, (you
may use the portal on your HUD to get there) and walk inside the Stronghold to
the Fountain of Justice in the middle. Click on the fountain statue that is on
top (not the bottom part of the fountain with the sit animations).
Fountain
of Justice: So, you want to learn about the whereabouts of the five symbols?
Listen well adventurer...
Fountain
of Justice: This fountain is worth to be examined closely. (Greenman)
Fountain
of Justice: Seek the forest ground near the castle. (Celtic Cross)
Fountain
of Justice: Someone should clean up the dust in the stronghold towers. (Sun)
Fountain
of Justice: A bath in the cold fresh water of the lake should help to clear
your mind. (Moon)
Fountain
of Justice: A shower under the waterfall is also an exciting experience.
(Green Woman)
You look carefully inside the water of
the Fountain of Justice and notice there is a plaque under the water. Zoom in
with your camera and click on the plaque. It is the Greenman. Click on
the plaque to receive the message:
Symbol
Green Man: The second symbol of five
(make note of this and continue)
Next, follow the 2nd hint and look
around the forest ground near the castle. You find the next symbol hidden in
the roots at the base of a tree in the forest. There you find the Celtic
Cross. Click on the plaque to receive the message:
Symbol
Celtic Cross: The fifth symbol of five
Go to the next hint location and search
the Stronghold towers.
Walk inside the Stronghold and go up the
stairs on the left side. Go around the upper ledge from the corner tower over
to the first central tower and look on the walls. There you will find the next
symbol, the Sun. Click on the plaque to receive the message:
Symbol
Sun: The first symbol of five
The next hint tells you to look in the
lake. Go to the main landing point and jump off the bridge into the lake.
Directly next to the bridge in the water you will find the next symbol, the Moon.
Click on the plaque to receive the
message:
Symbol
Moon: The third symbol of five
The last hint tells you to look near a
waterfall. You go to the waterfall across from the lake and search behind the
waterfall under the water. There you find the last symbol, the Green Woman.
Click on the plaque to receive the message:
Symbol
Green Woman: The fourth symbol of five
The final order of the symbols is the
following (this is the order you must click on them on the wall).
1. Symbol Sun:
The first symbol of five
2. Symbol
Green Man: The second symbol of five
3. Symbol
Moon: The third symbol of five
4. Symbol
Green Woman: The fourth symbol of five
5. Symbol
Celtic Cross: The fifth symbol of five
You return to the cemetery, open the grave,
drink from the 7th chalice and return to the room with the 5 symbols
on the wall. You click on the pentagram:
Pentagram:
Press five symbols in the right order, then pull the lever.
If you click on the symbols in the wrong
order, then click on the wooden lever, you will DIE.
Deadly
Trap: You have suffered a very painful and slow death.
Avalon HUD
- Version 2.2: You died. Click one of the teleport buttons in the HUD to
resurrect at the position of your choice and regain your ability to move.
If you have DIED, click the SKULL portal to
resurrect and return to the cemetery entrance. Return to the Symbols and try
again.
If you click on each plaque in the order
learned above, then pull the wooden lever to the right of the glass dome, the
glass dome disappears and you can click on the Fairy and obtain the CROWN OF
THE CRUSADER.
Fairy:
''Thank you for freeing me, my hero! Here is a humble reward...'
Second
Life: Fairy gave you 'Crown of the Crusader'
Next, click the ring box:
Ring of Ages: You have obtained
the Ring of Ages.
Ring of Ages: Use it inside the
crypt.
Second Life: Ring of Ages gave you
'Ring of Ages'
Lastly, click the chest on the floor to
receive the Fairy follower pet:
Reward: You have received a
reward. It's a fairy follower (boxed).
_____________________________________________________________________________________
ITEMS 9 & 10: GET
THE SPRAY CAN and CRYPT KEY
You wear the RING OF AGES and go
to the Crypt Entrance in the back of the cemetery, then click on the door.
Iron Gate:
The crypt door is locked.
Iron Gate:
Ask the statue of the crypt guardian, he'll tell you, how to get the key.
You see the statue behind you and click
on it:
Crypt
Guardian: ''Come closer, mortal. Step in front of me, very close, so I can tell
you the secret, how to obtain the key of the crypt.''
If you go closer and click again:
Crypt Guardian:
''That's close enough. Hold on, stay here and wait, while I'll search for my
script book...''
Crypt
Guardian: ''Hell, where is it?!?''
Crypt
Guardian: ''You fool! In vain, you run for your worthless life. You left the
place, so you'll never learn, how to find the key!''
A swarm of bees begins to attack you and
you will DIE.
Swarm: You
have disturbed a swarm of hornets.
Swarm:
Unfortunately, you have suffered a cruel and painful death.
Avalon HUD
- Version 2.2: You died. Click one of the teleport buttons in the HUD to
resurrect at the position of your choice and regain your ability to move.
If you have died, click the SKULL portal
to resurrect and return to the cemetery entrance.
You must find a way to survive the
hornets so you can speak to the Crypt Guardian.
After searching at length, you find a SPRAY
CAN with a picture of a bee on it. It is inside the Mortuary where you
found the CROWBAR, sitting on a window sill.
Spray Can:
This curious object seems to be from another time. You have found a can of...
insect spray??? Very strange.
Wear the SPRAY CAN and go back to
the Crypt Guardian. Click on the SPRAY CAN as soon as the bees appear.
(TIP: optional, for easier clicking, you can add this to your HUD center, and
click on the can as a HUD rather than holding it in your hands.)
The SPRAY CAN is a one-time
use, if you need to protect yourself against bees again, you will need to
collect another can from the Mortuary.
Return to the Crypt Guardian and click
on him again:
Crypt
Guardian: ''That's close enough. Hold on, stay here and wait, while I'll search
for my script book...''
Swarm: You
have disturbed a swarm of hornets.
Click the SPRAY CAN now.
Crypt
Guardian: ''Come closer, mortal. Step in front of me, very close, so I can tell
you the secret, how to obtain the key of the crypt.''
Crypt
Guardian: ''Hell, where is it?!?''
Swarm: You
have used the insect spray and killed the hornets.
Crypt
Guardian: ''Ah... there it is. All right, now this is the part where I tell
you... let me see...''
Crypt
Guardian: ''Mortal one, listen carefully!!! I'll tell you, how to obtain the
key of the crypt. Seek the grave of the White Lady and call her real name to
summon her. When she asks you for the reason, ask for the 'crypt key'. Her
grave is... well, you have to find it on your own.''
Crypt
Guardian: ''Hm, I wonder who wrote such a crap?!''
You must search the cemetery until you
find the correct grave. In the far back, left corner, you find a grave with a
"sit" animation and the name "Evelyn" on the gravestone.
You sit and call her name in local chat:
Alanna Bellerose: Evelyn
You hear thunder and suddenly an
apparition appears above the grave and speaks to you.
...: From
somewhere you hear a ghostly wail. You feel a presence of something...
something dead.
The White
Lady whispers: ''I hear you, mortal.''
The White
Lady whispers: ''Why did you call me, why did you disturb my sleep?''
Type “crypt key” in local chat.
Alanna Bellerose: crypt key
The White
Lady whispers: ''So you want to find the hidden entrance and enter the eternal
darkness of the catacombs?''
The White
Lady whispers: ''So shall it be. I will help you... Here is the key, that you
have asked for.''
The White
Lady whispers: ''Farewell, mortal. My time has expired.''
Second
Life: Crypt Key gave you 'Crypt Key'
Crypt Key:
You have obtained the crypt key.
_____________________________________________________________________________________
ITEMS 11 & 12: GET
THE TORCH & VIAL OF ANTIDOTE - ENTERING THE CRYPT & SOLVING THE SKULL PUZZLE
You go back to the Crypt entrance and
wear both your CRYPT KEY and the RING OF AGES.
You click a TORCH to either side
of the doors and receive one for later use.
Second
Life: Torch gave you 'Torch'
Next, you click on the crypt door. You
walk inside a room with plaques on all walls covered in skulls and there is a
statue in the middle of the room.
Click on the statue:
Death
Mother Statue: You shiver as you approach the strange statue.
Death
Mother Statue: ''The ring of ages awakens the dead. Touch the ring, then touch
three skulls in right order. The entrance into the darkness will open for
you.''
Death
Mother Statue: Maybe you should search the graveyard for some hints like
schemes or drawings.
You now need to learn which 3 skulls
need to be touched in order to open the door.
Return to the graveyard and search for
the schemes or drawings.
You search the graveyard for hints and
find a plaque covered in skulls behind the Mortuary (the building where you
found the CROWBAR and SPRAY CAN.)
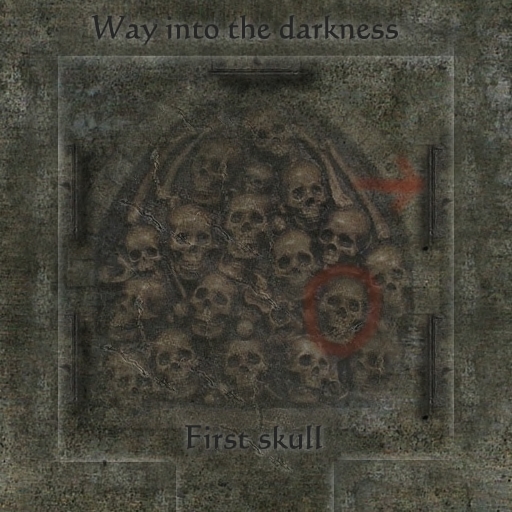
1. FIRST SKULL - you
find the plaque behind the shed. A skull is circled and there is an arrow
pointing to the plaque in the far, right location on the wall.
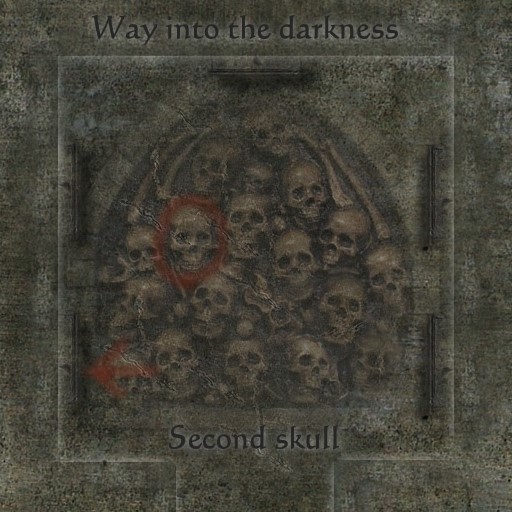
2. SECOND SKULL -
You walk inside a Haunted Crypt in the back, right corner of the cemetery and
see the plaque on the floor to the left side. It's very dark - you need a light
source to see better. A spider bites you and you die.
Spider:
Something is crawling on your back.
Spider:
It's a poisonous spider! It bites you. The poison kills you immediately.
You need to find an antidote to the
spider bite so you don't die. You return to the Mortuary and find a green VIAL
OF ANTIDOTE sitting behind the coffin. You click on it:
Vial with
Antidote: You have found a Vial with some kind of liquid. This could be an
antidote... or poison.
Second
Life: Vial with Antidote gave you 'Vial with Antidote'
The VIAL WITH ANTIDOTE is one-time
use. If you need to protect yourself against spider bites again, you will need
to collect another vial from the Mortuary.
Go back to the Haunted Crypt where you
found the SECOND PLAQUE. Wear the VIAL WITH ANTIDOTE and when
the spider bites you, click on the vial.
Spider:
Something is crawling on your back.
Spider:
You drink the antidote. The poison loses effect and does not harm you.
Wear your TORCH and find the
plaque in the back, left corner marked SECOND SKULL. Do not dally! The
spider will return! On the plaque, there is a skull is circled and there is an
arrow pointing to the first left location on the wall inside the crypt.
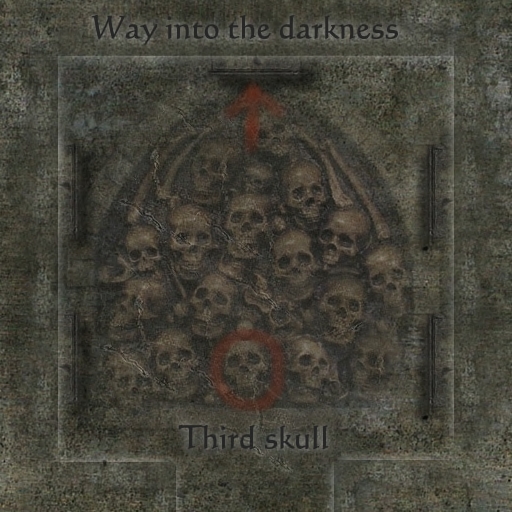
3. THIRD SKULL - You
find the 3rd plaque outside the cemetery gate, in the dirt pile where you found
the SHOVEL earlier. The third skull is circled and there in an arrow pointing
to the plaque located in the center of the far wall inside the crypt.
You return to the Crypt Entrance now and
go inside.
Wear and lick on your RING OF AGES.
(This may also be worn on the HUD to make clicking easier.)
Ring of
Ages: From somewhere beneath, you hear a clicking sound. Obviously, some kind
of mechanism has been activated.
Ring of
Ages: Now you have only a few seconds, to press the right skulls on the panels
Click on the skulls on the walls in the
correct order according to the plaques you found and the door to the crypt will
open.
CONGRATULATIONS! Now you are on the
next step of the quest ... you enter the Catacombs!!!
Go to Episode 1 - Part 2 - The Catacombs to continue with the next section of the guide.
|