THE
FIRST LEVEL OF THE CATACOMBS
The door to the catacombs opens, and you
walk down a ladder into the first room. You see a block of holding cells with
no passage to continue your journey. Upon further investigation, you find a
wooden lever towards the back of the room on one of the columns.
Click on the lever and you hear the
sound of a stone wall moving. Look to your right and notice a doorway has
opened. Walk through the passage into the next room.
_____________________________________________________________________________________
ITEMS 13 & 14: GET THE DIAMOND AND MYSTERIOUS GOLDEN CHALICE
As you enter the next room, you notice a ladder to the left. Stand close to the ladder and click on it to walk down. (If you are with others, be sure you walk down one at a time, waiting for each person to reach the bottom before the next person clicks to walk down. If more than one person tries to walk down at the same time, they will be ejected.)
Once you reach the bottom of the ladder, continue walking down to the end of the tunnel.
You make a left down a longer tunnel,
and reach 3 open doorways. Turn right and continue down another tunnel curving
to the right until you reach a room with a shiny golden chalice on display.
Enter the room. If you click on the MYSTERIOUS GOLEN CHALICE, you will DIE:
Mysterious
Golden Chalice: In your greed, you reach out for the chalice. Suddenly you hear
a clicking sound... you have triggered a deadly trap. You cry out in agony, as
the rusty thorns perforate your body.
Avalon HUD
- Version 2.2: You died. Click one of the teleport buttons in the HUD to
resurrect at the position of your choice and regain your ability to move.
Avalon HUD
- Version 2.2: You may teleport to each other place also. Be aware though, that
you will lose your protection on all alternatives.
If you have DIED, click the SKULL portal
to resurrect and return to the cemetery entrance.
You must return to the catacombs and
find a way to take the MYSTERIOUS GOLDEN CHALICE safely.
You return to the room with the gold
chalice and decide to click on the various corpses laying to the sides of the
room:
If you click the corpse to the left in
the front of the room:
Buried
Corpse: You really don't want to know what is wrapped inside this cloth.
If you click on the corpse to your
right:
Buried
Corpse: Yes, there is a rotten corpse inside.
If you click the corpse to the far
right:
Buried
Corpse: Probably a corpse.
If you click the other corpse to the far
left:
Rotten
Corpse: The rotting corpse is lying stiff on the unwrapped cloth. It's slumber
in rigor mortis has been disturbed.
Rotten
Corpse: I wouldn't touch it again, if I were you! Seriously!
If you click the corpse on the far left
again, you will DIE.
Rotten
Corpse: Suddenly the corpse starts to move.
Rotten
Corpse: You have been warned!!! Now it's too late to escape.
Rotten
Corpse: As you are stunned from the shock, the raised undead starts to rip the
flesh from your body. Your horrible death is slow and painful.
Storyteller:
A not so friendly specter killed you. At least that’s better than being haunted
for a lifetime.
Avalon HUD
- Version 2.2: You died. Click one of the teleport buttons in the HUD to
resurrect at the position of your choice and regain your ability to move.
If you have DIED, click the SKULL portal
to resurrect and return to the cemetery entrance.
You must return again and find a way to
collect the golden chalice safely.
As you enter the Catacombs once more,
you descend the ladder into the lower tunnels and turn to the left again. You
reach the 3 doorways and this time enter the chamber to the left. There you
see 2 coffins.
You click on the coffin on the right
side:
Grave Desk:
This stone plate won't move. Maybe you should look elsewhere for a mechanism to
open it.
You click on the coffin on the left
side:
Old Grave:
The inscription on the grave is unreadable. You try to move the stone lid, but
you fail.
You need to search for the mechanism to
open the coffin on the right. Exit the chamber and turn to your left,
descending down a tunnel that curves to the left. At the end of the tunnel you
will find a coffin. Search the wall behind the coffin for a unique brick on the
back wall towards the right side. Press it (click on it) and you will hear the
sound of stone moving.
Switch: As
you press the brick, you hear a sound of moving stone nearby.
Now be quick! Run up the ramp back from
whence you came and turn right, then right again into a room with 2 coffins.
The coffin on the right called “Grave Desk” will be open and you will see a
skeleton inside. Quickly, click on the remains and get the DIAMOND.
Human
Remains: Just human remains inside this tomb, resting in eternal peace... but
wait, what is this?
Human
Remains: As you search the remains, you find a large diamond. A valuable
treasure indeed. But might have some other purpose.
Second
Life: Human Remains gave you 'Diamond'
You exit the room from which you obtain
the DIAMOND and go through the doorway straight across the hall. You
proceed down the tunnel, curving to the right. You walk down the stairs and stop
when you reach the next doorway.
You see the shiny golden chalice upon a
pedestal at the far side of the room. To the right of the doorway, on the wall
you will see a brick that is different than the other bricks, with a round
shape on it.
Click on it this brick:
Socket:
This brick is different... looks like a sort of mechanism. There is an empty
socket.
You notice the socket is shaped similar
to the DIAMOND you collected earlier. Find the DIAMOND in your
inventory and “add” to wear it. Then, click on the socket on the wall.
Socket
whispers: As you insert the diamond into the socket, you hear a clicking sound
of a mechanism coming from the chamber nearby.
Now you may safely enter the room and
take the GOLDEN CHALICE.
Mysterious
Golden Chalice: Now, that the trap is disarmed, you take the golden chalice.
Mysterious
Golden Chalice: Could THIS be the holy grail??? ... Probably not.
Second
Life: Mysterious Golden Chalice gave you 'Mysterious Golden Chalice'
Now exit the room with the GOLDEN CHALICE and go back up the ramp and to your left, all the way down the hall to the end.
To your left is a dead end. To your
right is a room with 2 coffins.
You click on the dead-end wall:
Strange Wall: You feel a stream of cold air coming through a gap between the bricks. There seems to be a secret passage behind this wall. Maybe there is a mechanism nearby to move it.
You enter the room to the right with the
2 coffins:
If you click the left coffin:
Ancient
Grave: Something is moving beneath this stone plate... you hear scratching,
like bones on stone...
Ancient
Grave: Oh my god! It's coming out of the grave!!!
If you click the right coffin you will DIE:
Awakened Ghost:
''Aaah. Free at last... after hundreds of years.''
Awakened
Ghost: ''You have freed me, mortal. Well done! Since I am a grateful entity, I
will reward you.''
Awakened
Ghost: ''Your reward is...''
Awakened
Ghost: ''...YOUR DEATH. Muahahaha!''
Avalon HUD
- Version 2.2: You died. Click one of the teleport buttons in the HUD to
resurrect at the position of your choice and regain your ability to move.
If you have DIED, click the SKULL portal
to resurrect and return to the cemetery entrance. Go back inside the Crypt and
find a way to continue.
You go back to the last room where you
died and upon further investigation you find that the wall to your left is an
illusion. There is a passage in the center where you can actually walk through
the wall. When you walk through the illusion wall, you find yourself in a
short tunnel and you see a wooden lever at the end. Touch the lever.
Lever: As
you pull the switch, you hear the sound of moving stone, not far away.
You hurry back through the illusion wall
and out of the chamber to find that there is now a staircase that has been
revealed where the dead-end wall once stood. You walk up the staircase and at
the top of the stairs you see the skeleton remains of someone sitting in a
chair.
Click on the skeleton:
The
Forgotten King: This one died a long time ago. Apparently, he once held
something in his right hand...
Wear the GOLDEN CHALICE and touch
The Forgotten King. He takes the chalice and a door opens to your left.
The
Forgotten King whispers: You place the golden chalice in the hand of the
skeleton. Suddenly, a nearby wall moves aside and opens a hidden passage.
Go through the doorway and fall through
the floor, staying as close to the wall as possible.
When you fall, there is a platform about
halfway down. You need to land on this platform or you could be ejected for
"moving too quickly". Once you land on the platform, there is an
opening in the middle to jump from. Jump from this opening to reach your final
destination below.
THE SECOND LEVEL OF THE CATACOMBS
Congratulations! You have made it to
the second level!
PLEASE NOTE: IF YOU ARE USING THE
DEMO HUD YOU WILL NOT BE ABLE TO PROCEED FURTHER UNTIL YOU PURCHASE THE FULL
HUD. The Lifetime HUD may be purchased at the
cemetery entrance by clicking on the Rotating Golden Dragon HUD Giver above the
podium. The purchase price is $500 Lindens.
_____________________________________________________________________________________
ITEMS 15 – 17:
GET THE OLD KEY, OLD DIARY AND ANTIQUE LAMP
You find yourself standing upon a pile
of rubble and broken bricks… you brush yourself off from the fall and walk
through the doorway and continue on your journey.
You turn right into the next tunnel and
reach an intersection with a pile of boulders to your left, a tunnel straight
ahead and a tunnel to your right.
You advance to the tunnel that is
straight ahead and go to the end where you find a locked gate. You click on the
gate:
Rusty
Gate: A rusty gate. The gate lock is missing. Your attempts to open the gate by
force fail.
You turn back up the path and proceed to the left at the intersection. You
come to a very dark room on your left. You walk through the doorway and down a
very dark tunnel, then enter the room and can see a chest on the back wall inside
the room.
If you enter this room now, you will
DIE. When you go in, the room will become very dark. You will hear the
distinct sound of a heart beating and large glowing eyes will appear all around
you.
...: The darkness shrouded you.
You feel a penetrating pain, as sharp teeth starts to rip the flesh from your
body. Your death is cruel and painful.
Avalon HUD - Version 2.2: You
died. Click one of the teleport buttons in the HUD to resurrect at the position
of your choice and regain your ability to move.
If you have died, click the SKULL portal
to resurrect and return to the cemetery entrance.
Now you must return to this location and
continue to explore the tunnels. Return to the place where you found the room
of darkness only this time continue straight past the dark room to the end of
the corridor where you can turn either left or right.
If you turn right and walk downhill in a
tunnel curving to the right, you will reach an intersection at the end where
you can go left or right. If you turn to the right at this point you will find
a dead end. If you go to the left tunnel it is very dark and you cannot see
well. If you continue walking straight through the darkness, a Wraith will appear
in front of you and you will DIE.
Wraith
whispers: My preciousss, where is my preciousss??
Wraith
whispers: It hasn't found my preciousss, my birthday present!
Wraith
whispers: So we have to eat it. Mmmh, young and tasty...
Avalon HUD
- Version 2.2: You died. Click one of the teleport buttons in the HUD to
resurrect at the position of your choice and regain your ability to move.
If you have died, click the SKULL portal
to resurrect and return to the cemetery entrance.
You make note that the Wraith is looking for his “precious”. Could this be, perhaps… a ring? (Think of “Lord of the Rings”.)
Now go back to the room of darkness and
continue past the dark room to the end of the tunnel where you can go right or
left. Turn left this time. Go down a short way and you come to an end. Turn
left and a quick right to continue. You see a forked path in the tunnels to
the left and right. Go to the left and you come to what appears to be a dead
end. The wall has blood markings on it and you notice a bloody hand print on
the right, lower side of the wall. You push on the brick with the hand print
and it opens a passage.
Enter the chamber and turn to your left
where you see a coffin. Click on the coffin lid and it opens. You see a
skeleton holding a book and a key. You click on both to get the OLD KEY and the OLD DIARY.
Old Key:
The skeleton is holding an old key in his hand. You take it.
Second
Life: Old Key gave you 'Old Key'
Old Diary:
The old diary is covered with dark strains... looks like dried blood. You take
it.
Second
Life: Old Diary gave you 'Old Diary'
Wear the OLD DIARY and click on
it:
Old Diary:
The old diary is covered with dark strains... looks like dried blood. You take
it.
Old Diary:
The old diary is written in ancient letters.
Old Diary:
You open the book and start to read:
Old Diary:
''The darkness, it's everywhere! The shadows seem to live... something is
coming... I have to hide the other key... inside the chamber with bones...''
Old Diary:
''I'll hide inside this coffin, maybe it won't find me here...''
Old Diary:
The text ends here. The next sides are smeared with dried blood stains.
You make note that you must find a key
in the “chamber of bones”.
You examine the chamber further and find
another wall that is an illusion to the right of the coffin where you obtained
the OLD DIARY. You walk through the wall into another tunnel and see a
closed gate to your left. You decide to try opening the gate with your OLD
KEY.
Wear the OLD KEY and click on the
gate. You enter the room with 2 coffins and notice there is a small chest on
the ground. You click on the chest and receive an ANTIQUE LAMP.
Antique
Lamp: You take the antique lamp. It shines bright in deepest darkness.
Second
Life: Antique Lamp gave you 'Antique Lamp'.
You wear the ANTIQUE LAMP and click on
it:
Antique
Lamp: This antique lamp shines very bright. The light provides you protection
from the darkness.
_____________________________________________________________________________________
ITEM 18: GET THE
BRONZE KEY
Protection from the darkness? Hmm…. You
decide to return back to the room of darkness where you died and see if this
lamp will protect you from the evil.
Click the wooden lever on the right side
of the gate to exit the chamber and go back through the illusion wall, back
tracking all the way to the room of darkness with the eyes.
You enter the room of darkness and hear
the distinct sound of a heart beating…. The darkness comes and you touch the
lamp:
Avalon HUD
- Version 2.2 whispers: SND1
Antique
Lamp: This antique lamp shines very bright. The light provides you protection
from the darkness.
You wait and finally… the darkness is
replaced with light and the evil eyes vanish. You see a chest before you and
click on it. The chest opens and a BRONZE KEY is revealed. Touch the key to
obtain the BRONZE KEY.
Bronze
Key: You have obtained a bronze key.
_____________________________________________________________________________________
ITEMS 19 – 21: GET
THE RUSTY KEY, THE ONE RING, LION RUNE, ANCIENT BOOK CLUE, LOOSE PAGE CLUE
You return to where you found the fork
in the tunnel and go back to where you found the OLD DIARY and the OLD KEY in
the coffin. You walk through the illusion wall, and this time you turn right
down the tunnel and continue to explore.
You reach a set of double doors and
notice a square socket on each side of the doors. You click on them:
Socket: An
empty socket. Obviously, it is a part of the opening mechanism.
You note the shape of these sockets and that you must find something to fit them that will open the doors
Now you look to your left and see a dark tunnel. You may want to use a TORCH to continue down this tunnel. Wear your TORCH and proceed forward. You find yourself slowly traveling down a very dark tunnel that curves to the right. You reach a doorway covered in spiderwebs and walk through, entering a chamber full of skulls.
You recall the message in the OLD DIARY
about a key hidden in the room with bones and begin to search. You first
notice the pile of skulls and look through them carefully until you come upon a
“broken crane”. You click on the broken crane and receive THE ONE RING:
A Broken
Crane: Carefully you pick up the broken skull. There is something inside...
Second
Life: A Broken Crane gave you 'The One Ring'
A Broken
Crane: You have found a magical ring... It is THE ONE RING!!!
You continue to search further. You
walk up the ramp to the end and look down into the room from above. You notice
something sitting on the top of the door jam and zoom in closer and realize it
is a key. Touch this and get the RUSTY KEY.
Rusty
Key: You have found an old rusty key.
You look around further and notice a
raised panel on a wooden beam to the left of the coffins in the room. You
touch the raised panel and it opens a passage.
Object:
You have found a hidden switch. A part of the wall slides aside and reveals a
secret passage.
You walk down a short tunnel into another
chamber where you see a book on a pedestal to your left, a coffin in the
middle, and a parchment paper on the floor in the right corner.
You click on the ancient book to the
left:
Ancient
Book: ...After he had left his fellows, the brave knight continued his journey
through the darkness as well as he might, and ever the way became lonelier,
until at last he came to the edge of a deep dark chasm. (click)
You click again:
Ancient
Book: There the knight stood, without food and desolate, doubting whether he
should ever reach the other side. He prayed to god and king and so he gained
new hope and strength. (click)
You click again:
Ancient Book: Standing on the edge of the chasm, he called aloud ''Courage and belief will protect me''. Suddenly, he heard angelic voices and a strange light filled the surrounding. (click)
You click again:
Ancient
Book: Bravely, the knight stepped forth... (click)
And again:
Ancient
Book: The following pages are burned and unreadable.
Next you click on the coffin, it opens
and you see a skeleton inside with something in his hands. You click the object
and receive the LION RUNE:
Lion Rune:
There is a strange rune on the chest of the skeleton. You have found a lion
rune.
Lastly, you click on the page that is on
the floor in the right corner:
Loose
Page: There is a loose page on the floor. You read the following lines:
Loose
Page: ''...The Order of the Lion secured valuable objects with lethal mechanism
or magic traps.
Loose
Page: The spoken word 'veritas' was often used, to disable them.''
You exit the room of bones and return to
the main corridor.
_____________________________________________________________________________________
ITEM 22: GET THE
DRAGON RUNE
You recall the Wraith asking for his “precioussssss”
and now you have obtained THE ONE RING. Didn’t Gollum in Lord of the Rings
refer to the “ring” as his precious???? Hmmm…. You return to the Wraith to
offer him THE ONE RING.
You wear THE ONE RING and walk down the
dark tunnel where the Wraith is located and wait for him to appear. He speaks
to you:
Wraith
whispers: My preciousss, where is my preciousss??
You click on the ring to give it to him
to obtain the DRAGON RUNE.
The One
Ring: This is the one ring...
Wraith
whispers: Ooooh, it has found my preciousss! Give it to me!!!
Wraith
whispers: We'll give you a reward my preciousss.
Wraith
whispers: And then, we'll eat it!!!
Second
Life: Dragon Rune gave you 'Dragon Rune'
Dragon
Rune: You have obtained a dragon rune.
_____________________________________________________________________________________
THE THIRD LEVEL OF THE CATACOMBS
Item 23: GET THE RUSTY SWORD
You return now to where you found the
fork in the tunnel, and this time you decide to explore the right corridor.
You get to the end of the right corridor and find a set of double doors. You
open the doors to find a ladder taking you to the floor below. You walk down
the ladder and continue forward down a set of stairs into some murky green
water.
You continue forward and turn and reach
an intersection where you can either go left or right. To the left you can see
the door is blocked with wooden boards. You go to the right and continue down
the tunnel that curves to the left and you come upon a locked gate. You click
on the gate:
Rusty
Gate: This rusty old gate is locked.
Wear your RUSTY KEY and click on
the gate.
The gate opens and you may enter the
next chamber. You see a chest across the room. Walk over to the chest and
click on it. The chest opens to reveal a sword within. Click and obtain the RUSTY
SWORD.
Rusty Sword: You have found a sword. It is old and covered with rust. You take it.
Second Life: Rusty Sword gave you 'Rusty Sword'
Further investigation in this room
towards the left of the chest there is a brick with a hidden switch. Touch the
switch and it opens another passage. You walk through the passage through the
tunnels an come upon a very large chamber with a menacing, evil creature
standing before you. You sense danger but step forward slowly just a little and
click on the beast:
...: The
evil glowing eyes of the demon are watching you. Be careful, this creature of
darkness is not in mood for a conversation.
You recall the passage from the book in
the cemetery about Demons:
Demons are
evil Creatures of Darkness. They may appear in different forms. If you
encounter a demon, expect to suffer a horrible and painful death b being
possessed, burned, cursed, disemboweled or eaten alive... or everything
together. Running away won't help, since demons are always faster than you.
This is fair warning … you sense immense
danger and decide to turn back.
However, IF you are foolish enough to
approach the Demon at this time with no guard against the evils within, you
will DIE:
...: As
you approach the demon, he makes a strange gesture with his right claw. You
realize, it is too late to turn back now.
...: You
cry out in agony, as your flesh is burned from your bones.
Avalon HUD
- Version 2.2: You died. Click one of the teleport buttons in the HUD to
resurrect at the position of your choice and regain your ability to move.
If you have DIED, click the SKULL to
resurrect and return to the cemetery entrance.
_____________________________________________________________________________________
THE FOURTH LEVEL OF THE CATACOMBS
ITEMS 24 & 25:
GET THE SPELL SCROLL AND SILVER CHALICE
Now that you have 2 runes the same shape as the sockets by the double doors, you return to the tunnel that is forked and go back to the left tunnel. Proceed by clicking the brick with the bloody hand print, go through the illusion wall by the coffin in the next chamber, and proceed to your right down the tunnel until you reach the double door with the sockets. Wear both runes then click on the sockets. They fit perfectly! You hear the door unlocking and they open. You walk through to the next passage to find a room with a carpet covered with letters of the alphabet.
If you proceed to walk across the carpet
without thought, you fall into a pit full of spikes!!! You will DIE.
Deadly
Trap: Your body was perforated by rusty thorns. Your death was slow and
painful.
Avalon HUD
- Version 2.2: You died. Click one of the teleport buttons in the HUD to
resurrect at the position of your choice and regain your ability to move.
If you have died, click the SKULL portal
to resurrect and return to the cemetery entrance.
Go back to the carpet of letters, and
this time you notice a sign to the right of the door that reads:
“Only
those, knowing our court, may pass. The tribunal for examination and punishment
of heretics.”
Upon doing some research you find that
the Inquisition was A Roman Catholic tribunal for
investigating and prosecuting charges of heresy. You look closely at the
carpet before you and begin your attempt to cross the room by walking over the
letters that spell out “INQUISITION.”
You walk over the
carpet on the corresponding letters and make it safely across. You find
yourself descending even deeper into the catacombs as you walk down another
flight of stairs. You reach a landing, turn to your right and descend yet
another set of stairs to a landing covered in blood stains. You see a piece of
paper on the floor and click on it.
Loose Page: There is a note lying on the floor. You try to read the
lines, but the only words you decipher, are ''H. P. Lovecraft mentioned the
author of the Necronomicon in his novels. His name was...''. The rest of the
writing is faded and unreadable.
If you click on the wall where the loose
page is sitting, an apparition appears and speaks to you:
Visage of
Decay: ''Mortal fool! What is it, that you want? You want me to open this
passage for you?''.
Visage of
Decay: ''I might let you pass, if you answer my question correctly.''
Visage of
Decay: ''Fail, and you die.''
Visage of
Decay: ''Who wrote the book of dead, known as the Necronomicon?''
You must answer within 1 minute or
else…. You will DIE.
Visage of Decay: ''Your time has
expired, ...as well as life.''
Visage of Decay: ''And now...
DIE!!!''
Avalon HUD - Version 2.2: You
died. Click one of the teleport buttons in the HUD to resurrect at the position
of your choice and regain your ability to move.
If you have DIED, click the SKULL to
resurrect and return to the cemetery entrance.
Go back to the Visage of Decay once you
have found the answer to his riddle. If you Google for Necronomicon, you will
find a Wiki page:
https://en.wikipedia.org/wiki/Necronomicon
It tells you in the first paragraph:
"The Necronomicon is a fictional
grimoire (textbook of magic) appearing in the stories by horror writer H. P.
Lovecraft and his followers. It was first mentioned in Lovecraft's 1924 short
story "The Hound",[1] written in 1922, though its purported author,
the "Mad Arab" Abdul Alhazred, had been quoted a year
earlier in Lovecraft's "The Nameless City"."
Go back to the Visage of Decay. Click on
the wall and wait for him to ask you the riddle again. Then type: Abdul
Alhazred into local chat.
Visage of
Decay: ''Mortal fool! What is it, that you want? You want me to open this
passage for you?''.
Visage of
Decay: ''I might let you pass, if you answer my question correctly.''
Visage of
Decay: ''Fail, and you die.''
Visage of
Decay: ''Who wrote the book of dead, known as the Necronomicon?''
Alanna Bellerose: Abdul Alhazred
Visage of
Decay: ''Your answer is right. You may pass, mortal. Farewell.''
The passage opens and you may enter the
hidden chamber. You walk into the room and see a wooden chest at the far wall
with an object in front of it. You click on the chest:
Wooden
Chest: The chest is locked. There is a mechanism below. Probably, it will
unlock the chest.
Wear your RUSTY SWORD and click
the mechanism. The chest opens and you receive the SPELL SCROLL.
Slot: The
rusty sword fits perfect into the slot below. You hear a clicking sound and the
chest opens.
Spell
Scroll: You have found a spell scroll.
Second Life:
Spell Scroll gave you 'Spell Scroll'
Wear the SPELL SCROLL and click on it:
Spell Scroll: This scroll contains powerful spells against creatures of darkness.
Next, look to the left in this room and you see a wall covered in blood stains. Walk through the wall. It is an illusion. You enter another chamber and see a corpse curled up in the corner. It appears to be holding something…. You click on the corpse:
Decaying
Corpse: This decaying body is sitting in the corner of this chamber. Obviously,
he died in horrible pain. The smell is awful!!!
You click him again:
Decaying
Corpse: As you examine the decaying corpse, you notice a chalice in his grip.
Click a third time:
Decaying
Corpse: Carefully, you remove the chalice.
Decaying
Corpse: As you remove the dirt from the chalice, you notice, that it is
beautiful and shiny.
Second
Life: Decaying Corpse gave you 'Silver Chalice'
Wear the SILVER CHALICE and click on it.
Silver
Chalice: The chalice is empty.
(Perhaps you need to fill it with
something?)
You exit these chambers and return to
the landing in the main corridor.
_____________________________________________________________________________________
FILL THE SILVER
CHALICE WITH WATER
As you return to the main landing, you
see a set of double doors to your left. If you enter this next room and walk
forward, you will encounter the Soul Devourer. If you click on it, and you DIE.
...: It's
a heap of bones, corpses and slime, ... You realize, you are standing before a
Soul Devourer.
...: You
came too close and captured the attention of the Soul Devourer. Too late you
realize your fatal mistake.
Avalon HUD
- Version 2.2: You died. Click one of the teleport buttons in the HUD to
resurrect at the position of your choice and regain your ability to move.
If you DIE, click the SKULL to resurrect
and return to the cemetery entrance.
Make your way back to the room with the
Soul Devourer. This time wear your SPELL SCROLL. Open the double doors
and stand at the entrance of the room and click on your SPELL SCROLL.
...
whispers: Aloud, you recite the forceful spell. The Soul Devourer collapses
into a heap of slime and bones.
The Soul Devourer collapses and you may
pass. You see a fountain at the far end of the room. Quickly go to the
fountain and wear your SILVER CHALICE. Click on the fountain:
Fountain
of Life: The water is cold and clear.
Fountain
of Life: You fill the chalice with the water from the Fountain of Life.
Fountain
of Life: Drink it at the place where steel and stone are one. Then you will be
able, to part them again.
Your chalice is now filled with water. Exit this room and proceed further down the next set of stairs to continue.
_____________________________________________________________________________________
ITEMS 26 – 29: GET
THE VIAL OF ANTIDOTE, BLACK MAGIC SPELL BOOK, CROWN OF THE LION, DRAGON
CHALICE, SILVER KEY
Walk down the set of stairs to a
landing, and continue further down another stairway. You reach the end of the
tunnel and can go either left or right. You see an elven woman entwined in tree
roots to your left and cannot pass, so you continue to the right down a short
corridor. You reach another left or right choice… to the right the tunnel is
blocked, so you proceed to the left.
As you walk to the left, there is a
doorway covered in spiderwebs. If you walk through this doorway, a spider will
emerge and bite you! You will DIE.
Spider:
Something is crawling on your back.
Spider:
It's a poisonous spider! It bites you. The poison kills you immediately.
Avalon HUD
- Version 2.2: You died. Click one of the teleport buttons in the HUD to
resurrect at the position of your choice and regain your ability to move.
If you have died, click the SKULL portal to resurrect and return to the cemetery entrance. Go to the Mortuary and collect another VIAL OF ANTIDOTE that is behind the coffin. (This is the same antidote you collected earlier in the quest.) Take a copy of the antidote and return to the passage with the spider web.
Wear the VIAL OF ANTIDOTE and
walk through the door and you will see the message:
Spider:
Something is crawling on your back.
Click on the VIAL OF ANTIDOTE.
Spider:
You drink the antidote. The poison loses effect and does not harm you.
You may now delete the VIAL OF ANTIDOTE
from your inventory. It has only a one-time use. If you need to return to
this place you will have to collect another vial from the Mortuary.
Continue through the tunnels and you
come to a steel door. Open the door and enter the next area.
You see a gate to your left. You click
on the gate:
Iron
Gate: The iron gate is locked.
Wear your BRONZE KEY and open the
gate.
You stand before a large chasm. If you
walk across the chasm without thought, you will DIE.
Dark Abyss: Fortunately, you fell unconscious, so you didn't feel, when your body shatters in pieces as it crashes on the floor.
You have DIED.
Avalon HUD - Version 2.2: You died. Click one of the teleport buttons in the HUD to resurrect at the position of your choice and regain your ability to move.
Click the SKULL portal to resurrect and return to the cemetery entrance, then go back to the room with the large chasm.
You recall reading about a chasm earlier
in the Ancient Book…
Ancient
Book: Standing on the edge of the chasm, he called aloud ''Courage and belief
will protect me''. Suddenly, he heard angelic voices and a strange light filled
the surrounding.
Ancient
Book: Bravely, the knight stepped forth...
You type into local chat: Courage and
belief will protect me
Alanna Bellerose: Courage and belief will protect me
You hear music and the chasm glows with
a blue light. You walk safely across the center of the chasm and enter
the next chamber.
You see a chest sitting in front of you,
a skull, a chalice and a smaller chest to the left.
You click on the large chest and receive
the BLACK MAGIC SPELLBOOK.
Second
Life: Black Magic Spellbook gave you 'Black Magic Spellbook'
Black
Magic Spellbook: You have found a spellbook about elemental magic.
Wear the BLACK MAGIC SPELLBOOK and click on it:
Black
Magic Spellbook: The spellbook contains many powerful summoning spells.
Next you notice a skull to the left of
the chest on the floor. If you click on the skull without thought, you will
DIE….
King's
Skull: In your greed, you have triggered a deadly trap. The rusty thorns
perforate your body. Unfortunately, you didn't survive.
Avalon HUD
- Version 2.2: You died. Click one of the teleport buttons in the HUD to resurrect
at the position of your choice and regain your ability to move.
If you have died, click the SKULL portal
to resurrect and return to the cemetery entrance.
You recall something you read earlier,
from the loose page near the skull room:
Loose
Page: ''...The Order of the Lion secured valuable objects with lethal mechanism
or magic traps.
Loose
Page: The spoken word 'veritas' was often used, to disable them.''
You return to the room across the large
chasm where you just died and recite the word “veritas” into local chat while
standing in front of the chest.
Alanna Bellerose: veritas
King's
Skull whispers: You have disarmed the trap. Now you may take the crown and the
chalice.
Click on the skull to receive the CROWN
OF THE LION.
King's Skull:
Carefully you remove the crown from the skull. You have obtained the Crown of
the Lion.
Second
Life: King's Skull gave you 'Crown of the Lion'
Click on the Chalice to obtain the DRAGON
CHALICE.
Dragon
Chalice: You take the Dragon Chalice.
Second
Life: Dragon Chalice gave you 'Dragon Chalice'
Click on the small chest to obtain the SILVER
KEY.
Silver
Key: You have obtained a silver key.
Second
Life: Silver Key gave you 'Silver Key'
As long as the chasm is still glowing
with light you may walk back across it safely. If it is not glowing, you must
recite the words again in order to pass safely.
You cross back over the chasm and exit
through the gate back into the open area and see a wooden door across the
room. You click on the door:
Heavy
Wooden Door: This door is locked.
Wear your SILVER KEY and try
again. The door opens to reveal a ladder descending down to another level of
the catacombs.
____________________________________________________________________________________
REGISTER YOUR AVATAR IN THE DRAGON LAIR WAITING AREA
Before you proceed further to the Lava Room, it is advantageous to register your avatar in the Dragon Lair waiting area so you can use the Skull Teleporter from the Graveyard entrance.
If you opened the door with your SILVER KEY, go back out into the previous corridor where you will see the statue of a medieval warrior carved into the wall. Click on the statue.
You will receive a riddle that you must solve. When you know the answer, type it into local chat. The riddle changes daily.
You click on the wall:
Voice in
your Head whispers: ''Another day, another riddle. Know the answer and you may
pass.''
Wait for the riddle and then type the
answer in local chat:
1. Voice in your Head whispers: Thirty white
horses on a red hill: first they champ, then they stamp, then they stand still.
Answer:
TEETH
2. Voice in your Head whispers: It walks on four
legs in the morning, two legs at noon and three legs in the evening. What is
it?''.
Answer: MAN
3. Voice in your Head whispers: There is a house. One enters it blind
and comes out seeing. What is it?
Answer: SCHOOL
4. Voice in your Head whispers: Four hang, four
sprang, two point the way, two to ward off dogs, one dangles after, always
rather dirty. What am I?
Answer: COW
5. Voice in your Head whispers: It is greater than
God and more evil than the devil. The poor have it, the rich need it and if you
eat it you will die. What is it?''.
Answer:
NOTHING
6. 'Voice in your Head whispers: What always runs
but never walks, often murmurs, never talks, has a bed but never sleeps, has a
mouth but never eats?''.
Answer:
RIVER
7. Voice in your Head whispers: At night they come
without being fetched. By day they are lost without being stolen. What are
they?''.
Answer:
STARS
8. Voice in your Head whispers: The more you have
of it, the less you see. What is it?''
Answer:
DARKNESS
9. Voice in your Head whispers: I am always hungry,
I must always be fed, The finger I touch, Will soon turn red''.
Answer: FIRE
10. Voice in your Head whispers: 'Until I am measured I am not known,
Yet how you miss me when I have flown.''.
Answer: TIME
11. Voice in your Head whispers: Your feet, All day I will follow no
matter how fast you run, Yet I nearly perish in the midday sun.''.
Answer:
SHADOW
12. Voice in your Head whispers: My life can be measured in hours, I
serve by being devoured. Thin, I am quick. Fat, I am slow. Wind is my foe.''.
Answer:
CANDLE
13. Voice in your Head whispers: The one who makes it, sells it. The
one who buys it, never uses it. The one that uses it never knows that he is
using it. What is it?''.
Answer:
COFFIN
14. Voice in your Head whispers: I never was, am always to be. No one
ever saw me, nor ever will. And yet I am the confidence of all, to live and
breathe on this terrestrial ball. What am I?
Answer:
TOMORROW
15. Voice in your Head whispers: What’s black when you get it, red when
you use it, and white when you’re all through with it?'
Answer: CHAARCOAL
16. Voice in your Head whispers: You heard me before, yet you hear me
again, Then I die, ’till you call me again
Answer: ECHO
17. 'Voice in your Head whispers: What does man love more than life,
Fear more than death or mortal strife, What the poor have, the rich require,
and what contented men desire, What the miser spends and the spendthrift saves,
And all men carry to their graves?
Answer:
NOTHING
18. Voice in your Head whispers: Say my name and I disappear. What am
I?''.
Answer:
SILENCE
19. Voice in your Head whispers: Kings, lords and Christians raised
them, since they stand for higher powers. Yet few of them would stand, if women
ruled this world of ours.
Answer:
TOWER
20. Voice in your Head whispers: It’s red, blue, purple and green, No
one can reach it, not even the queen. What is it?
Answer:
RAINBOW
21. Voice in your Head whispers: Feed me and I live, give me drink and
I die. What am I?
Answer: FIRE
22. Voice in your Head whispers: This thing all things devours: Birds,
beasts, trees and flowers. Gnaws iron, bites steel, Grinds hard stones to meal,
Slays king, ruins town And beats high mountain down.''.
Answer: TIME
23. Voice in your Head whispers: ''You see me quite often, But don’t
really care. If you pass by me, You’ll often stop and stare. I can’t speak or
see, But don’t think me uncouth, Because no matter what, I always tell the
truth. What am I?''
Answer:
MIRROR
When you answer the riddle correctly,
the wall opens and you may pass through. Walk down the set of stairs, turning
right at the end of the tunnel and down another set of stairs into a round room
with a door to your left. Open the door to the left and walk through it. You will see the following message:
The Guardian of Avalon: Let me see... Did you really reach the lower levels? Stay put until your name is embossed to the stone tablet of the Ancients.
The Guardian of Avalon: Your name is written down now. You are now able to teleport down here from the graveyard entrance.
Congratulations! You are now registered
in the database and may use the SKULL TELEPORT that is located at the entrance
of the cemetery to teleport directly to the dragon lair.
You may use the teleport to travel to the Lava Room faster.
Now, return to the door that opens with your SILVER KEY and continue.
____________________________________________________________________________________
THE FIFTH LEVEL OF THE CATACOMBS
GET ITEMS 30 – 34 & 79: SHIELD, PENTAGRAM RUNE, PENTAGRAM TIARA, PENTAGRAM NECKLACE, CROWN OF THE EAGLE & SHOULDER GOLEM
Descend the ladder and walk through the
tunnels staying to your left, you come upon a hot, lava filled chamber. You notice
there are stepping stones and realize the challenge you now face. You must
jump across these stones, without skipping any, in the proper order, until you
reach the other side. If you hit the lava at any time… you will DIE.
Lava: You
have decided to take a bath in hot lava. Soon you realize your fatal mistake.
Before you begin this task there are
some things you should know:
Firestorm settings:
1. Go to Preferences, Move and View, Movement Tab
and click the following:
2. Arrow keys always move me
3. Pressing letter keys affects movement
4. Uncheck the following:
5. Use AZERTY keyboard layout
6. Go to Preferences, Move and View, Mouselook Tab
and uncheck the following:
7. Show avatar in Mouselook
8. Enable your Advanced settings and go to Developer,
Render Metadata, Avatar Hitboxes – you will see a box around your avatar
9. Go to Mouselook and look down… you will see the
“box” and a small cross hair. The cross hair is where you are aiming. The box
represents your avatar. You want to aim the cross hair and the box onto the center
of your desired landing target when you are jumping.
10. In order to jump you may use the letter E key or page up key.
11. Hit the space bar to slow down your descent. While doing this you
can turn your avatar to face the direction and aim towards your landing
destination. When you release the space bar you will again move more quickly
and will be able to advance forward.
12. Use the space bar intermittently in order to keep your avatar moving
towards the desired location slowly.
13. You can use W, A, S, D or your arrow keys to move forward, left,
back, right.
Next, I highly recommend that you
practice your jumping skills in the Avalon Village area on the logs jumping
challenge pictured here:
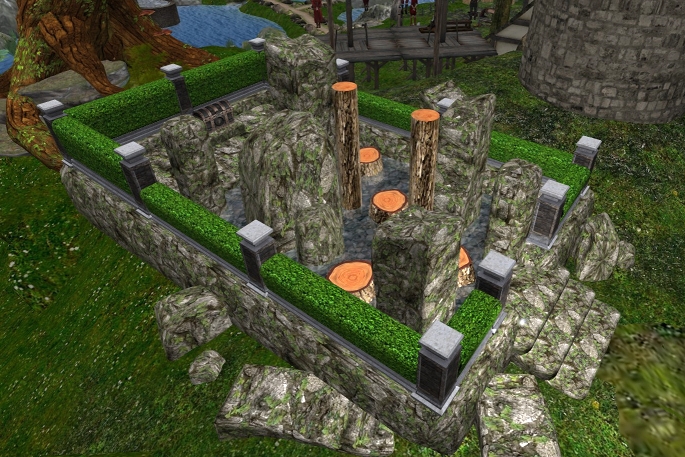
You will have to start over if you hit the water, but you won’t die so you just have to go back to the front of the challenge to start over again if you fall or miss a jump. Master your jumping skills here before you return to the lava room.
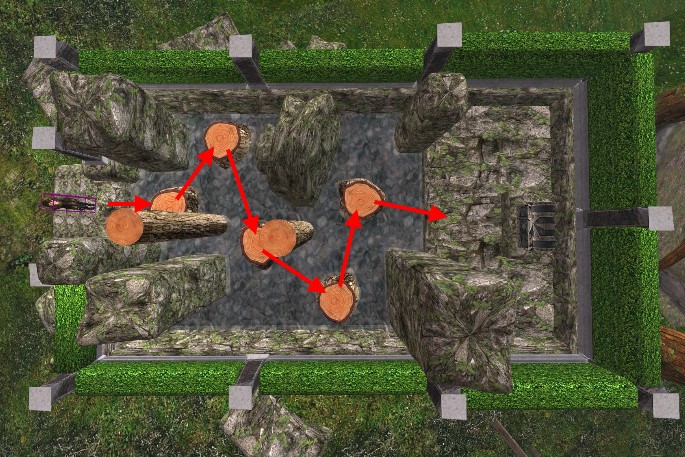
Now get ready to jump:
1. Go into Mouselook and place the cross hair in
the middle of the log you want to jump to.
2. Hit your E letter key to jump, then your W
letter key to move forward.
3. Slow down your forward movement by hitting the
space bar and keeping it pressed down.
4. Now look down at the log, and intermittently
release space bar, move forward, press space bar, aim, release space bar, move
forward, press space bar, etc. to slowly aim your avatar over the log.
5. Try to look straight down through the bottom of
your hitbox to see where your avatar is going to land.
6. Once your avatar hitbox and cross hair are both
centered over the log do not press the W key. Release the space bar to fall
straight down onto the log.
7. Aim the cross hair onto your next log, hit E to
jump, W to move forward, and repeat the above steps.
8. If you fall into the water at any time you must
go back to the beginning and start over.
Be sure to take the prize from the chest
at the end when you have made it across safely!!
Treausure
Chest: Congratulations. You have mastered the log maze!
Second
Life: Quartz Golem gave you 'Shoulder Golem'
Now you are ready to return to the lava
room. Go forth brave soul…
Return to the lava room and jump the
rocks across the lava pit. When you reach the other side of the room, you will
enter a chamber with hot lava on either side, be sure to remain on the path or
you will surely die.
At the far end of the path you will find
3 shields hanging on a wall, a chest, and skull with a crown.
Take the shield of your choosing:
Steel
Shield: You have chosen the Steel Shield.
Second
Life: Steel Shield gave you 'Steel Shield'
Congratulations! You have obtained the
shield you will need for your final encounter in the dragon lair!
Next click on the skull to receive the CROWN
OF THE EAGLE.
King's
Skull: Carefully you remove the crown from the skull. You have obtained the
Crown of the Eagle.
Second
Life: King's Skull gave you 'Crown of the Eagle'
Lastly, you must click on the chest. If
you click on the lid of the chest, you will DIE.
Stone
Chest: You have triggered a trap. As you carelessly open the lid, poisonous gas
begins to stream out.
Stone
Chest: The poisonous gas begins to take effect. You scream in agony, as the gas
fills your lungs. Your death is slow and painful.
Stone
Chest: Next time, try to find a mechanism to open this chest.
Avalon HUD
- Version 2.2: You died. Click one of the teleport buttons in the HUD to
resurrect at the position of your choice and regain your ability to move.
Avalon HUD
- Version 2.2: You may teleport to each other place also. Be aware though, that
you will lose your protection on all alternatives.
Avalon HUD
- Version 2.2: Resetting the HUD will also unlock your movement, but the
protection is wearing off, too.
If you have DIED, click the SKULL portal
to resurrect and return to the cemetery entrance. Go back to the Lava Room and
jump across the stones to the other side. Walk up to the chest but this time,
look behind the chest for a wooden lever.
Click on the wooden lever to open the
chest and receive the PENTAGRAM RUNE, PENTAGRAM TIARA and PENTAGRAM
NECKLACE.
Lever: You
have successfully disabled the trap. The chest opens.
Pentagram:
You have found a strange magical rune and an amulet. Wear the amulet to pass
the magic portal nearby.
Second
Life: Pentagram gave you 'Pentagram Rune'
Second
Life: Pentagram gave you 'Pentagram Tiara'
Second
Life: Pentagram gave you 'Pentagram Necklace'
NOTE: If you are with a group you will
have to wait 10 minutes before the next person can take a shield.
_____________________________________________________________________________________
ITEMS 35 & 36: GET THE EXCALIBUR SWORD & BELT
Now you must return to the catacombs to
the place where there is a fork in the tunnel to the left and the right. Go to
the right side where you found the green, murky water and travel through the
tunnels again back to the Rusty Gate. Use your RUSTY KEY to open the gate, go
inside and find the hidden switch on the brick to the left of the chest.
Go through the newly opened passage and
stay to your right through the tunnels until you come to the large chamber with
the Demon.
Wear your BLACK MAGIC SPELLBOOK and walk towards the Demon. You hear music begin to play, and you click on the BLACK MAGIC SPELLBOOK:
...: With
strong voice, you recite a powerful spell from the book.
Black
Magic Spellbook: The spellbook contains many powerful summoning spells.
...: The
demon wails and dissolves in black smoke.
The Demon turns into a cloud of black
smoke and it is now safe for you to run past into the next area.
You now see a shiny sword held tightly
inside a stone. You try to take the sword… but nothing happens. You recall
the message from the Fountain of Life when you filled your SILVER CHALICE:
Fountain
of Life: Drink it at the place where steel and stone are one. Then you will be
able, to part them again.
You wear your SILVER CHALICE that is filled with water and click on it to drink the water. Click on the sword to receive your EXCALIBUR SWORD and EXCALIBUR BELT.
Silver
Chalice: You drink from the chalice. Suddenly you feel a strange power floating
through your body.
Second
Life: Excalibur gave you 'Excalibur'
Excalibur:
You grasp the handle of the sword. With ease, you pull it out of the stone. You
have obtained the Legendary ''Excalibur''.
Second
Life: Excalibur gave you 'Excalibur (belt)'
You have done it!!! Congratulations,
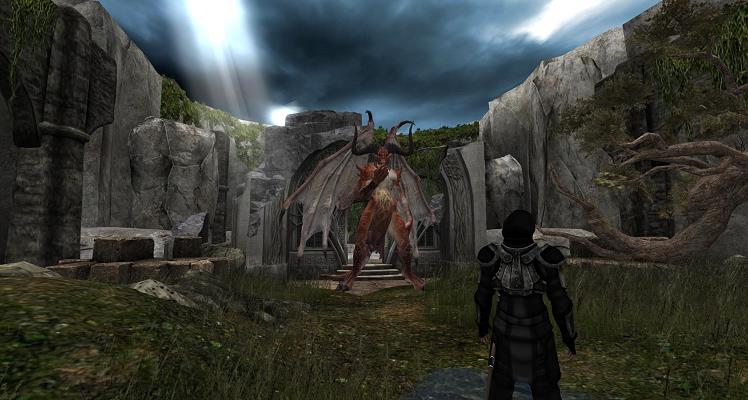
you are ready for the final encounter – get ready to battle the legendary beast
in his lair. Go to the Dragon Encounter.
|